
If you’re looking to build your floristry skills or style a standout arrangement for a special occasion, our step-by-step guide to creating a classic hand-tied spiral bouquet is here to help
A classic hand-tied spiral bouquet is one of the most beautiful floral arrangements you can create and one of my go-to options for special occasions or as a gift for friends and family. The spiral method can be a little bit tricky to start, but it’s very rewarding once you’ve mastered it.
I don’t mind admitting that it took me a while to perfect my technique and I spent hours rearranging the same stems and trying different methods until it became a muscle memory. Now, a hand-tied spiral bouquet always looks professional and neat in my glass vases.
My biggest piece of advice when creating a spiral hand-tied bouquet is to relax, both physically and mentally. If you’re feeling stressed or uptight, it will show in your finished piece. So, I recommend putting on some relaxing music, shaking out any tension in your arms and shoulders, and simply focusing on enjoying the process of making this spectacular spiral hand-tied bouquet.


The tools
To build your hand-tied bouquet, you’ll need:
- 1 x vase
- 50cm of twine
- Sharp secateurs
I like to use a glass vase as it shows off the spiralling stems. Our Medium Apothecary Vase is a great option and measures H19cm x W19cm.
The flowers
You may wish to adjust your list of flowers depending on your personal preferences, but my signature hand-tied spiral bouquet includes:
- 10 x Paperwhites
- 6 x Rose Casa Blanca
- 5 x White Stock
- 8 x White Ranunculus White Elegance
- 6 x Double White Tulips
- 8 x Double White Freesia
- 6 x White Blossom
For the foliage, I use:
- ½ bunch x Pittosporum
- 1 x Olive bunch
Step-by-step: creating a hand-tied bouquet
Step 1
Start by preparing your stems. Aim to remove any foliage that will sit below the tie point of the bouquet, and then lay the stems out in front of you on a flat surface. One simple hack is to group them by variety so that you can quickly pick the right stems and instantly see what you have left while building your bouquet.

Step 2
Next, prepare the twine. Don’t be tempted to leave this until you’ve finished forming your bouquet as it’s much more difficult to do when you only have one hand spare to tie it off. Take a length of twine long enough to wrap around the entire bouquet and knot a loop at one end. Be sure to leave enough twine free on the other side of the knot so that you can tie it later.


Step 3
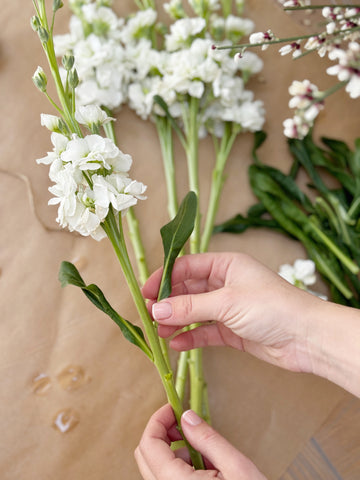
Now, it’s time for the fun bit! Choose your first flower and place it in your hand, resting between you thumb, index, and middle fingers. If you’re right-handed, place the stem in your left hand and vice versa. For my bouquet, I start with a Stock stem as I find it easier to choose a larger piece to kick things off.


Step 4
Next, choose another flower and cross it over the first stem at a slight angle. This position ensures that the stems cross over and is integral to creating the spiral. I like to use a Pittosporum stem at this stage.
Step 5
Use your dominant hand to turn the two stems a full 180 degrees before passing them back to your other hand to add the next stem. This action may feel a bit unnatural and awkward at first, but as you continue to build the bouquet, it will become a lot easier.
Step 6
When adding the next stem, place it at the same angle as the first and repeat step 5. Don’t worry if it takes you some time to get this right, it’s worth pausing and trying again until you can complete each step easily.
Top Tip - Keep an eye on the positioning and height of each flower head. At this point, they’ll all vary in length, but we’ll trim and neaten them up at the end.


Step 7
Hold the stems loosely – if they fall, you can easily pull them back up into place later. Adding each new stem at an angle and passing it between your hands while turning is the key to creating a spiral hand-tie bouquet.
Step 8
Your bouquet turns may vary as you work, so if you notice gaps, look at your remaining flowers and consider which will work best in the space. Perhaps you need a tall and thin stem, a large and round variety, or a small filler piece? As you build, you’ll find it much easier to keep adding stems and turning the bouquet and you’ll be rewarded with a beautiful spiral.


Step 9
As you come to the end of your bouquet, start bringing the flowers slightly lower down so that they form a dome shape.
Step 10
Once you’re happy with the design, take your twine and hook the loop over the little finger of the hand that’s holding your bouquet. Wrap the longer length around the bouquet and feed it through the loop. Pull it back on itself and go around again to meet the other length of twine, so you can tie it with a tight, secure knot.


Step 11
Hold the bouquet against your chosen vase and trim the stem ends to fit. It’s always best to leave them longer and cut more later than take too much off too early. Ideally, the bottom of the bouquet should touch the rim of the vase. The stems are too long if the arrangement tilts to one side. If the bouquet will be given as a gift or is for a special occasion like a wedding, add a touch of luxury by wrapping silk ribbon around the twine. I like to make a simple knot and let the ends flow free.


Top Tip - As the bouquet gets bigger, it’ll become heavier and more difficult to hold in one hand. If you struggle with this, tie the bouquet off before continuing to add more stems, safe in the knowledge that your work is secure.
Feeling inspired? Head over to our YouTube channel @thesuffolknest
or Instagram @the_suffolk_nest to discover even more arrangements and watch me in action as I demonstrate how to make a spiral bouquet that you can try yourself: